 Overview and Basics
This document is divided into the following sections:
- Overview
- Main Components and Structure Basics
- PROJECT SETUP - Step 1 - Define the Database Schema
- PROJECT SETUP - Step 2 - Initialization
- PROJECT SETUP - Step 3 - First Sync
- AFTER PROJECT SETUP - Basics of Accessing Data
Overview
The PHP SmartDB was created to aid software development. This framework provides a solution to organize and accelerate PHP data-driven application development with a database backend (i.e. MySQL).
The PHP SmartDB will let you write PHP applications that store info in a database without writing any SQL! It's all PHP- you don't have to use a separate lPHanguage just to communicate with a database. The framework provides a structured foundation to keep your code organized. You'll spend less time debugging SQL errors (ugh) and more time creating your software. After reading about the project setup (below), use the Quick Start Kit to start your database application using this proven foundation.
The PHPSmartDB maps a SQL database's structure and data using common PHP syntax and XML. For example, lets create a new customer named "Fig Newton" with the SmartDB:
$customer = $GLOBALS['db']['Customer']();
$customer['Name'] = "Fig Newton";
//$customer->MyCustomFunction(); -- sneak peak. Adding row-level custom functions and callbacks (i.e. OnAfterDelete) is a breeze.
$customer->Commit();
Click here to see a bunch of little code snippets like the above
The PHP SmartDB also allows for pluggable, structured custom PHP logic when working with database data (i.e. MySQL). A basic understanding of how SQL works is recommended, but is not required. You never need to write any SQL with the PHP SmartDB, though that option is available.
The PHP SmartDB not only lays a foundation for organizing your data-driven application code, but it also simplifies working with HTML forms, form validation (front-end javascript and back-end PHP), $_POST, and $_GET.
Main Components and Structure Basics
The PHP Smart DB is broken down into 5 main components (mimicking any typical relational database structure):
- SmartDatabase - contains any number of SmartTables. Has methods to add/remove tables to the database structure, or load entire database structures from XML database schemas
- SmartTable - contains any number of SmartColumns and SmartRows. Has methods to add/remove SmartColumns (structure), and has methods create/lookup/delete rows of data within the particular table (data)
- SmartColumn - defines a column's name, data type, and other attributes for the column within the SmartTable (such as if the column is required, if it's a key column, etc.). These properties define and often restrict data for each of the SmartCells in that column.
- SmartRow - manages 1 set of SmartCells. SmartCell's contain all of the actual stored data. SmartRows easily handle saving and inserting new data via Commit(). We can define entire objects around a row's structure and implement custom PHP directly on these row objects (i.e. a single Customer, or a single Invoice), and even create custom functions to return formatted data for that particular object (i.e. "GetFirstName()" and "GetLastName()" that will automatically split a "Name" column on the space).
- SmartCell - contains the actual database data. This is where a row and a column meet. SmartCells actually have access to all methods/properties of a SmartCell AND a SmartColumn
Database structure vs data:
- Structure is defined in: SmartDatabases, SmartTables, and SmartColumns
- Data is mainly accessed through: SmartRows and SmartCells
It may help to visualize these elements. Here is an illustration of a simple database structure containing 2 tables:

A simple database structure containing data may look like the following:
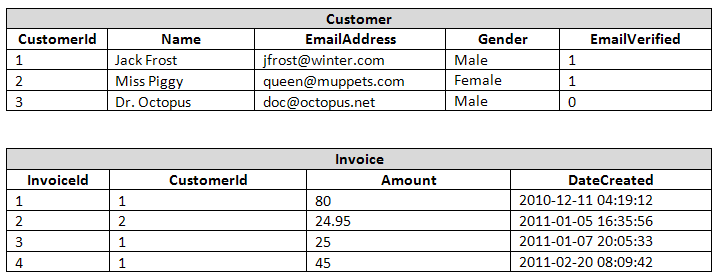
The illustration above shows 2 tables in our database. The Customer table contains 5 columns (CustomerId, Name, EmailAddress, Gender, and EmailVerified), and the Invoice table contains 4 columns (InvoiceId, CustomerId, Amount, and DateCreated). The Customer table has 3 rows of data (i.e. 3 Customer objects), and the Invoice table has 4 rows of data (i.e. 4 Invoice objects).
PROJECT SETUP - Step 1 - Define the Database Schema
The XML schema represents the database structure only (i.e. how the data will be stored- not the data itself). This schema lets the PHP SmartDB know the structure of your database. It enforces this structure when coding and it is used to create/synchronize the structure of the actual SQL tables/columns. We don't have to worry about creating/modifying the actual SQL database structure at all… this XML document is the only place you should make your database schema changes (NOT in phpMyAdmin or etc. You can, but it's not necessary or recommended). This XML schema can easily be adjusted when we need to make adjustments to our database structure... we just have to re-synchronize after modifying the XML (more below).
NOTE - Every table should have a Unique, Auto-Increment, Primary Key column set on it. It's not a requirement, but it sure makes things a lot easier to work with. (CustomerId and InvoiceId are these columns in the graphics above.)
We'll create the file database/db.xml to match the database schema from the tables drawn above. (Note - we can also use PHP to define this structure if we want, but XML is recommended.)
Note - It is also possible to generate an XML file from an existing database if you already have one created.
<?xml version="1.0" standalone="yes"?>
<CodeGenSchema xmlns="http://www.w3.org/2001/XMLSchema">
  <Class>
    <Database TableName="Customer" InheritsTableName="_Common">
      <Field Name="CustomerId" DataType="int" IsUnique="true" PrimaryKey="true" AutoIncrement="true"
                  ForeignKeyID="1" />
      <Field Name="Name" DataType="varchar" MaxSize="255" TrimAndStripTagsOnSet="true" InputRequired="true" />
      <Field Name="EmailAddress" DisplayName="Email Address" DataType="varchar" MaxSize="255" TrimAndStripTagsOnSet="true"
                  InputRequired="true" IsUnique="true" />
      <Field Name="Gender" DataType="enum('Male','Female')" InputRequired="true" />
      <Field Name="EmailVerified" DisplayName="Email address has been verified" DataType="binary" MaxSize="1" DefaultValue="0"
                  InputRequired="false" />
    </Database>
  </Class>
  <Class>
    <Database TableName="Invoice" InheritsTableName="_Common">
      <Field Name="InvoiceId" DataType="int" IsUnique="true" PrimaryKey="true" AutoIncrement="true" />
      <Field Name="CustomerId" DataType="int" InputRequired="true" ForeignKeyID="1" />
      <Field Name="Amount" DataType="double" InputRequired="true" />
    </Database>
  </Class>
  <Class>
    <Database TableName="_Common" IsAbstract="true">
      <Field Name="DateLastModified" Aliases="Timestamp" DisplayName="Date Last Modified" DataType="timestamp" />
      <Field Name="DateCreated" DisplayName="Date Created" DataType="timestamp" />
    </Database>
  </Class>
  <ForeignKey Name="CustomerId" ForeignKeyID="1">
    <Relation TableName="Customer" FieldName="CustomerId" />
    <Relation TableName="Invoice" FieldName="CustomerId" />
  </ForeignKey>
</CodeGenSchema>
(To view all allowed XML elements, attributes, and values, check out the XML Schema file: XmlSchema.xsd)
There are a lot of options. Some of the more common options are in the example above. Here's a list of ALL attributes available to Field elements (i.e. SmartColumns). See the XmlSchema.xsd for a complete reference:
* If not otherwise specified, default values are 0 / null / empty / false (all the same)
- Name - string - Required
- Aliases - string - a comma-separated list of other names used to reference this column in PHP (advanced)
- DisplayName - string - Defaults to the Name field above if empty. Make it readable if it's not already.
- DataType - string (see the list below) - Required
- char - MUST SET MaxSize for this DataType
- varchar - common - MUST SET MaxSize for this DataType
- text - common
- mediumtext - common
- longtext
- blob
- mediumblob
- longblob
- tinyint
- smallint
- mediumint
- int - common
- bigint
- float
- double - common
- decimal
- date
- datetime - common
- timestamp
- time
- binary - common - can be set to 1 or 0/null (treat 0 and null the same in your app. avoid headaches)
- enum - common - Example: DataType="enum('Value 1','Value 2','Something Else')"
- set - common - Example: DataType="set('Value 1','Value 2','Something Else')". Set examples.
- Collation - string - Defaults to the server default. Can be "utf8_general_ci" or "latin1_swedish_ci"
- PossibleValues - string - Comma-separated list (This is set automatically when the DataType is enum)
- MinSize - int - Minimum number of characters allowed
- MaxSize - int - Maximum number of characters allowed - Required For DataType "varchar" and "char"
- if DataType is "decimal", format is "precision,scale" (Ex: "16,2") - Default is "14,4" - AllowSet - true/false - Default is true
- TrimAndStripTagsOnSet - true/false
- AllowGet - true/false - Default is true
- AllowLookup - true/false - Default is true
- AllowGetAll - true/false - Default is true
- DefaultValue - string - if set, all new rows will use have this value set for this column
- InputRequired - true/false - (you'll want this false for AutoIncrement columns since the server sets the value)
- InputEmptyError - string - The default error is pretty good if you set the DisplayName when needed
- Example - "Email Address is required."
- InputRegexCheck - a regular expression string (no leading/trailing slashes or modifiers. Is always case-insensitive!)
- Example for Phone Number - ^([0-9]{1,3}[-. ]?)?(?[0-9]{3})?[-. ]?[0-9]{3}[-. ]?[0-9]{4}$
- Example for Email Address - ^[_a-z0-9-]+(.[_a-z0-9-]+)*@[a-z0-9-]+(.[a-z0-9-]+)*(.[a-z]{2,4})$
- InputRegexFailError - string - The default error is pretty good if you set the DisplayName when needed
- Example - "Email Address is invalid."
- FormType - string - (Doesn't really matter since you can get any form type for any column at any time)
- text - This is the default if not set
- password
- checkbox
- radio
- select
- textarea
- hidden
- colorpicker - for use with jQuery UI or similar
- datepicker - for use with jQuery UI or similar
- slider - for use with jQuery UI or similar
- IsUnique - true/false - should have at least 1 per table (on the PrimaryKey column)
- PrimaryKey - true/false - should have at least 1 per table
- AutoIncrement - true/false - should have at least 1 per table (on the PrimaryKey column)
- FulltextIndex - true/false (advanced). By MySQL restrictions, only for char, varchar, and text columns
- ForeignKeyID - int - used to reference a cell or set of related cells on other tables. See Quick Start Kit for an example.
*All of the above options can be accessed at any time within your PHP project. These are properties of a SmartColumn. See API
(A good standalone version of an XML example file is available in the Quick Start Kit. It's a good starting point.)
PROJECT SETUP - Step 2 - Initialization
Once we have our database structure defined in our XML file (i.e. db.xml), we need to create a link to the actual backend SQL database.
- Note - Currently, the PHP SmartDB only has support for a MySQL database (other databases can be supported by creating a new DbManager class that implements from the DbManager interface. Options should mimic those used for the MySQL implementation).
We'll create our DbManager link and initialize the SmartDatabase in a file called include/include.php (a complete, project ready example of this file is available in the Quick Start Kit):
<?php
//Required files... the SmartDatabase and a DbManager
$smartDbPath = dirname(__FILE__)."/../../../SmartDatabase.php";
$dbManagerPath = dirname(__FILE__)."/../../../DbManagers/DbManager_MySQL.php";
require_once($smartDbPath);
require_once($dbManagerPath);

//-- create a DbManager object --
//The given username must have access to the MySQL server, and the database is assumed to already be
//created. If the database is not created, we can create it after we have a DbManager object (see below)
$db_server = "localhost"; //mysql host
$db_username = "smartdb"; //mysql username
$db_password = "smartdb123"; //mysql password
$database_name = "smartdb_test"; //mysql database

//It is recommended that the dbManager be stored in a global for easy access from anywhere within the project
$GLOBALS['dbManager'] = new DbManager_MySQL($db_server, $db_username, $db_password, $database_name); //initialize DbManager

//If the database is not yet created, don't pass $database_name into the DbManager constructor, and uncomment this:
//$GLOBALS['dbManager']->CreateDatabase($database_name); //an "Access denied" here means your user is restricted on a SQL level
//$GLOBALS['dbManager']->GrantUserPermissions($database_name, $db_username); //an "Access denied" means user SQL restriction

//The location of the XML database schema file for this project
$dbSchemaPath = dirname(__FILE__)."/../database/db.xml";

//Initialize the SmartDatabase object. It is built from a DbManager connection and
//an XML schema document (both passed to the SmartDatabase constructor). It is recommended
//that the SmartDatabase be stored in a global for easy access from anywhere within the project
$GLOBALS['db'] = new SmartDatabase($GLOBALS['dbManager'], $dbSchemaPath);

//If we want to synchronize our XML schema to the actual database, uncomment this. Dont always leave it uncommented!
//$GLOBALS['db']->SyncStructureToDatabase(true); //true prints the results
//die; //die when synchronizing. we don't want to do anything else
?>
PROJECT SETUP - Step 3 - First Sync
We need to sync our XML database structure to the actual SQL database. This will create the actual tables, columns, indexes, etc. that hold our data within the database. We'll create a file called include/_sync.php, then we can execute this file anytime we make a change to our database schema's XML document (database/db.xml). (Note - backup tables are automatically created before any table is modified. You may need to prune these tables from time to time.)
<?php
require_once("include.php");
//we now have a $GLOBALS['db'] and a $GLOBALS['dbManager'] to work with

//synchronize our XML schema to the actual database
$GLOBALS['db']->SyncStructureToDatabase(true); //true prints the results

die; //die when synchronizing. we typically won't ever want to do anything afterwards
?>
Once our actual database is synchronized with our XML schema, we're ready to roll. (A complete, project ready example of this file is available in the Quick Start Kit)
AFTER PROJECT SETUP - Basics of Accessing Data
The SmartDB works bottom-up.
We always start at the SmartDatabase level:
- $GLOBALS['db'] - SmartDatabase object (see API for methods/properties)
Navigate to a SmartTable:
- $GLOBALS['db']['Customer'] - SmartTable object. The name of the table (i.e. Customer) is defined in our XML (see setup step 1)
Then navigate to a particular SmartColumn, or lookup/create SmartRow(s):
- $GLOBALS['db']['Customer']['Name'] - SmartColumn object. Column names are defined in our XML (see setup step 1)
- $GLOBALS['db']['Customer']['Name']->LookupRow(...) - returns a SmartRow object
- $GLOBALS['db']['Customer']['Name']->LookupRows(...) - returns an array of SmartRows
- $GLOBALS['db']['Customer']->LookupRow(...) - returns a SmartRow
- $GLOBALS['db']['Customer'](...) - a shortuct for LookupRow(...)
- $GLOBALS['db']['Customer']->LookupRows(...) - returns an array of SmartRows
- $GLOBALS['db']['Customer']->GetNewRow() - returns a new Customer SmartRow object
- $GLOBALS['db']['Customer']() - shortcut for GetNewRow()
- continued... see API. Lots of options for getting rows sorted, unique, with limits, based on values, based on multiple value, etc.
SmartCells contain the actual data and can be accessed from a SmartRow or a SmartColumn:
- $customerRow['Name']->GetValue(...) - returns the actual data in the cell
- $customerRow['Name'](...) - a shortcut for GetValue(...)
- $customerRow['Name'] - note that this does not access the data of the cell! this gets a SmartCell object from within a SmartRow object
- $GLOBALS['db']['Customer']['Age']->GetMaxValue() - returns an actual value
- continued... see API. Lots of aggregate functions available.
Check out a bunch of Short Code Snippets to see this syntax in action.
Using the schema defined above, here's a simple example of how we would interact with our database:
<?php
require_once("include/include.php");
//we now have a $GLOBALS['db'] and a $GLOBALS['dbManager'] to work with

/** Example SmartDatabase, SmartTable, and SmartColumn references **
 * $GLOBALS['db'] - SmartDatabase object. Has access to all SmartDatabase methods (See API)
 *
 * $GLOBALS['db']['Customer'] - SmartTable object. Has access to all SmartTable methods (See API)
 * $GLOBALS['db']['Invoice'] - SmartTable object. Has access to all SmartTable methods (See API)
 *
 * $GLOBALS['db']['Customer']['Name'] - SmartColumn object. Has access to all SmartColumn methods (See API)
 * $GLOBALS['db']['Invoice']['Amount'] - SmartColumn object. Has access to all SmartColumn methods (See API)
*/

//** Lookup and Create SmartRows **/
//We'll first get access to 2 separate rows- one existing row of data ($row) and one brand new row to insert ($newRow)

//In the Customer SmartTable, lookup the existing SmartRow object with the Primary Key (CustomerId) = 4
$row = $GLOBALS['db']['Customer']->LookupRow(4);
//$row = $GLOBALS['db']['Customer'](4); //an alternative to explicitly calling LookupRow, as above.
//Note - there are ways to lookup rows sorted, unique, with limits, based on values, based on multiple value, etc.

//get a NEW SmartRow on the Customer SmartTable
$newRow = $GLOBALS['db']['Customer']->GetNewRow();
//$newRow = $GLOBALS['db']['Customer'](); //an alternative to explicitly calling GetNewRow, as above.

/** Example SmartCell references **
 * Referencing the column name on a SmartRow takes you to that cell
 * $row['Name'] - The 'Name' SmartCell ("column") in the row we just looked up above
 * $newRow['EmailAddress'] - The 'EmailAddress' SmartCell ("column") in the new row we just created above
 *
 * NOTE - SmartCells have access to all methods and properties of SmartCells AND SmartColumns (See API)
*/

//Set data on the rows' SmartCells
$row['Name'] = "Jack Frost";
$newRow['EmailAddress'] = "jfrost@winter.com";

//Get data from the rows' SmartCells
$email = $newRow['EmailAddress']->GetValue(); //will give us "jfrost@winter.com"
$name = $row['Name'](); //will give us "Jack Frost". This syntax is a shortcut to ->GetValue() and is recommended!

//Common mistake getting data from a SmartCell
//$NameSmartCell = $row['Name']; //this references the SmartCell! Add parenthesis (like above) to get the cell's value

//check for errors (i.e. column not set, "Email Address" already in use, etc)
$errors = $row->HasErrors(); //returns an error string or empty string if there are no errors
$errors .= $newRow->HasErrors(); //returns an error string or empty string if there are no errors

//Save data ( throws Exception if you Commit() a row that HasErrors() )
if(!$errors){
  $row->Commit(); //saves changes in the existing row
  $newRow->Commit(); //inserts the new row
}
?>
Quick Start Kit
- A Quick Start Kit is available with all of the code described above, in skeleton form. It's ready for you to customize and go!
Live Examples
- See a bunch of Short Code Snippets
- Check out the Basic Live Examples to see some live code in action!
- More Advanced Live Examples
- Form Examples